

Hello
My Name is Dawn
As
you can see by many of my pages on my site. I love decorating rooms.
I came across Jaddells site, and instantly feel in love with her tutorials..
She has so
many fantastic and unique rooms to do....Jaddell is a very
Sweet Woman,
Who spends so much time making these tuts for us, That I
wanted to give
something back to her. So Jaddell and I
decided that I would write a
tutorial
on decorating the rooms. I have included
the images in a zip file for you
for all the images you see in this room! They are
below!
I am sorry but I had
to upload 3 zip files for the PSP files.
You
can download the zip file's with the images for this room
Zip file 1 here.
Zip file 2
here.
Zip file 3 here.
I
have designed this tutorial to be very easy for you. you will have 12 layers to
work with.
Not
including the layers from the room tutorial itself. If you have not done the
Tutorial on
this
room, please go do the room first then come back here. Here is the link , click
the
star
to get there. If you have done it, continue on!

Jaddells Site!
Her link is also below!
If you would prefer a plain text file to print out click here.
Lets
get started. You should have Jaddells room 26 done, and still open in PSP.
Open
the zip file of images that I have supplied for you. Open them all in PSP.
minus
them on the bottom till needed. Here we go, hope this helps you.
Everything
should already be sized just right to copy and paste..
I did
go to my layer pallet first and delete the black background layer.
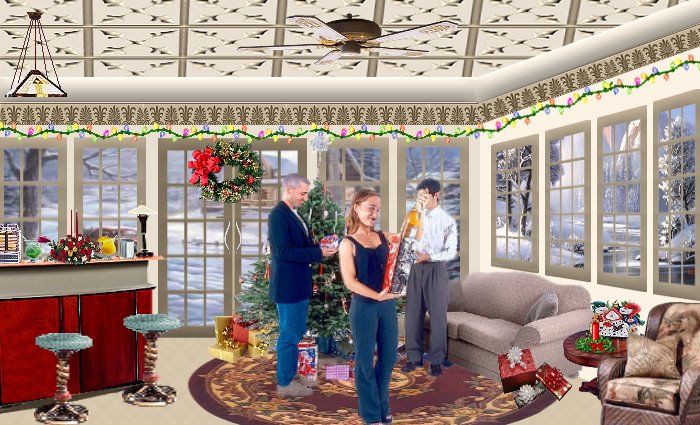
1. First
thing we will be doing is adding our outside Pictures.
Click
on your layer palette on your merged layer which should be your ceiling.
now click on your rightside-outside pic. Edit Copy, then go back to your
room again,
click it, then click edit paste as new layer.
(This
is how we will be doing every layer, so I will just say copy or paste)
The rightside-outside pic will be on top of your ceiling layer, we need
that under the ceiling layer, so we will grab that layer and move it under
the
merged layer. keep that layer highlighted in your palette.
2. Click on your leftside-outside pic. Edit Copy, back to room,
edit paste as new layer.
you can move the backgrounds around with your mover tool the cross.
so they are lined up right. just click on either of the 2 layers you just added
and
u can move them. when you have them how you like them you can move on.
3. Now go back to your layer palette and click on the last layer on
the top, which
should be layer 13. (if its not, click last layer) click on your door
handles, copy.
Back to your room, Paste as new layer, mover tools to move them on
door.
(Make sure this layer is still highlighted in palette)
4. Now click on your Christmas lights, copy. Back to room,
paste as new layer.
Move them to above the windows, you will see I merged them and made them
right
size for the room. (Make sure this layer is still highlighted in palette)
5. Click on Bar-stools copy, back to room, paste as new layer, again
mover tool
move to left side, as I did mine.
(Make sure this layer is still highlighted in palette)
6. Click on your wreath, copy, back to room, paste as new layer.
move the wreath to center of doors.
(Make sure this layer is still highlighted in palette)
7. Click on Ceiling-Light copy, back to room, paste as new
layer.
Move the light to above the bar.
(Make sure this layer is still highlighted in palette)
8. Click on your Ceiling -Fan copy, Back to room, Paste as new layer.
Move the light to the center of the room.
(Make sure this layer is still highlighted in palette)
9. Click on Couch-People, Copy, Back to room, Paste as a new layer.
Move them to the right side of the room. till your happy with them.
(Make sure this layer is still highlighted in palette)
10. Click on Christmas-Table, Copy, Back to room, Paste as new
layer.
Move the table next to the couch.
(Make sure this layer is still highlighted in palette)
11. Click on Whicker-Chair , Copy, Back to room, paste as new layer.
Move the chair into the corner next to the table as above.
Ok I saved this for last to show you how to move layers under layers.
12. First open your layer palette, Click on layer 3. Which should
be your
Carpet layer. if its not, find your Carpet layer, you can move your mouse
over
the layer and you will see it. Make sure the Carpet layer is highlighted in your
palette.
Click on your Floor Rug Image . Copy, Back to room, Paste as a new layer, that
should
have put the rug under all the layers but on top of carpet, move to where it is
centered
under couch and people.
You are done!!!
Here is another quick note. When I did the bar, it
was empty, so what I did was find
things I wanted to add on it... so I made sure the bar was highlighted in my
layer palette.
I added everything I wanted on top of my bar, adding a new layer on top, for
each item
Then I shut off all the layers in the palette
,except for the bar and things I wanted on it..
move everything where you want it. Make sure
one of the layers is highlighted,
and merge all visible, that way you don't have so many layers to work with. Also
if I
want more then one of the items in my picture, I go to Layers/
Duplicate.
So working with layers , the MOST IMPORTANT thing is to have the layer you
want
to work on, highlighted, and always put everything on a new layer. If you were
using
your regular tubes, and not having them open in PSP, Always go to layer, and
add
new layer first. Otherwise you can not move things around if your not happy with
where
they are. Or if you decide you don't like the tube you inserted. Click on layer,
right click
and delete. Also always remember when decorating a room, perception is a
important
key to making your room, scenery or anything you make, look real. Example. Never
have huge couches in front of a door that is real tiny or say a cat
bigger then anything
in the room, make sure everything is sized
correctly!
I hope this tutorial has helped you in some way! if you have any questions
feel
free to E-Mail me, My E-mail is Below.
Also if you would like to see some of the room's That Sandy, Gwenny and I
Have done, Check out pages 51- 52 On my site!
Thanks and Enjoy!

|
|
|
|
|
This tutorial is Listed at these places so far!
|
|
|
 |
|

|
|
|
|
|
|

|
|
|
|
|
|
|
|
|
|
|
|
|
|
|
|
|
|
|
|
|
|
|

|
|

|
|
|
|
|
|
|
|
|
|
|
WebMasterEngine.com
A Comprehensive Webmaster resource aiming to list links to everything a webmaster could need.
Thank You! |
|
  
Page last updated on
08/14/2004 10:12:11 AM

(c) Outlaw by Design 2003
|